Hydroponic gardening is a wonderful way to teach kids about science, sustainability, and the magic of growing food without needing soil!
A simple mason jar is one of the easiest and most exciting ways to start hydroponics at home. Children will love watching their plants grow roots and sprout leaves right before their eyes, all while learning about the wonders of nature. Plus, they’ll get to harvest their very own vegetables in just a few weeks!
Why Hydroponics?
Hydroponics is the process of growing plants in water instead of soil, using nutrients added directly to the water. It’s clean, efficient, and incredibly fun for kids because they can see the whole growing process unfold. Using a mason jar makes this project even more fun and accessible, as it’s something most families already have in their kitchen.
What You’ll Need:
Before you start, gather these materials:
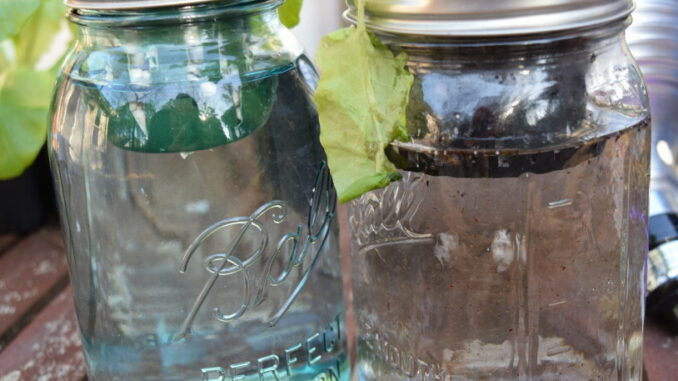
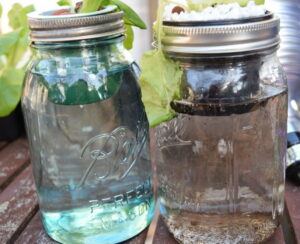
– Mason jar (or any clear jar)
– Net cup (small plant pot that fits the mouth of the jar, normally 2-3 inches depending on the inside diameter of th jar lip) or DIY substitute (yogurt cup with holes)
– Hydroponic growing medium (like clay pebbles or small stones)
– Vegetable seeds (lettuce, spinach, or herbs like basil work great)
– Water
– Hydroponic nutrient solution (available at gardening stores or online)
– Aluminum foil or paper to cover the jar (optional but recommended to block out light. If you do not block out the jar which the roots will grow, algae will form in the water.)
– A sunny windowsill or grow light
If you do not readily have any of these materials I find that Amazon is a good source to find inexpensive supplies that you will need.
Step-by-Step Guide to Mason Jar Hydroponics
Step 1: Choose Your Plant
Start by choosing the type of vegetable or herb you want to grow. Leafy greens like lettuce, spinach, and kale are perfect for beginners because they grow quickly and require minimal care. Herbs like basil, mint, and cilantro also work well in small spaces like a mason jar.
Step 2: Prepare the Mason Jar
Fill your mason jar with water, leaving about an inch of space at the top. Add the recommended amount of hydroponic nutrient solution according to the label instructions. The nutrients will give your plant everything it needs to grow big and strong!
Next, wrap the outside of the jar in aluminum foil or paper. This will prevent light from reaching the water, which can cause algae to grow. Kids can decorate the outside of the jar with stickers or drawings for a personalized touch!
Step 3: Prepare the Net Cup or DIY Substitute
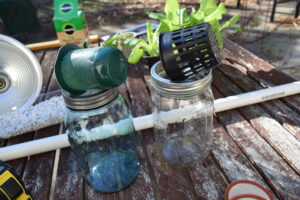 If you’re using a net cup, place it in the mouth of the jar. If you don’t have a net cup, you can make your own by cutting holes into a small plastic cup (such as a yogurt container). The holes should be big enough for the roots to grow through but small enough to hold the growing medium inside.
Fill the net cup or DIY cup halfway with the hydroponic growing medium, which helps hold the plant in place and supports the roots. Insert the net cup, or DIY susbstitute into the lip of the mason jar, making sure that the cup is touching the water. Another solution is to add wicks to the cup and let them hang into the water. This will work depending on the growing media you are using. Amazon has an inexpensive solution which includes a net pot and wicks for both 2 or 3 inch openings.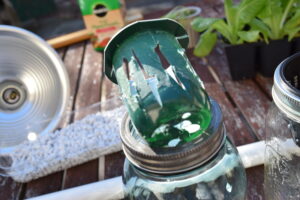
Step 4: Plant the Seeds
Place a few seeds in the growing medium. If you’re growing something like lettuce or basil, a couple of seeds should be enough. Cover the seeds lightly with more of the growing medium.
Step 5: Set Up Your Hydroponic Garden
Place the net cup (or DIY cup) into the mouth of the mason jar so that the bottom of the cup touches the water. The roots of the plant will eventually grow down into the water to absorb the nutrients.
Make sure your jar is in a sunny location or under a grow light. The plants will need at least 6-8 hours of light each day.
Step 6: Watch and Wait
This is the exciting part! Over the next few days and weeks, kids will be able to observe their seeds sprout and grow. The roots will extend into the water, and soon the leaves will start to appear. Encourage children to check on their plants every day and monitor their growth.
Step 7: Maintain the Water
As the plants grow, the water level in the jar will decrease. Make sure to top it off with water regularly so the roots are always submerged. Every couple of weeks, refresh the water and add more hydroponic nutrient solution to ensure the plant gets the necessary nutrients.
Step 8: Harvest Time!
In just a few weeks, your plants will be ready to harvest! Use scissors to snip off leaves or herbs as they grow. Your child will love adding their home-grown veggies to salads, sandwiches, or even smoothies.
Learning and Fun Combined
Hydroponic gardening with mason jars is a simple, fun, and educational project that gives children the joy of watching something grow from seed to vegetable. Plus, they’ll get to enjoy fresh, healthy produce they grew themselves!
This project teaches kids valuable lessons about plant biology, ecosystems, and responsibility as they care for their plants. They also get to experience the excitement of growing food with their own hands. Best of all, it’s easy and inexpensive, making it a perfect weekend or after-school activity. So grab a jar, gather some seeds, and get ready for an adventure in indoor gardening.
Let the growing begin!
Leave a Reply